 Move Kubernetes Components
Open Kubernetes Components
Here are the main Kubernetes components with brief descriptions:
Control Plane Components:
- kube-apiserver: Frontend for the K8s control plane; exposes the K8s API
- etcd: Consistent and highly-available key-value store for all cluster data
- kube-scheduler: Watches for newly created pods with no assigned node, selects nodes for them
- kube-controller-manager: Runs controller processes (node, replication, endpoints, service account & token controllers)
- cloud-controller-manager: Embeds cloud-specific control logic
Node Components:
- kubelet: Agent that runs on each node; ensures containers are running in a Pod
- kube-proxy: Network proxy that maintains network rules on nodes
- Container runtime: Software responsible for running containers (Docker, containerd, CRI-O)
Add-on Components:
- DNS: Cluster DNS service for service discovery
- Dashboard: Web-based UI for cluster management
- Network plugins: Implement the Container Network I
Kubernetes Components
143 words
Move Kubernetes Architecture
Open Kubernetes Architecture
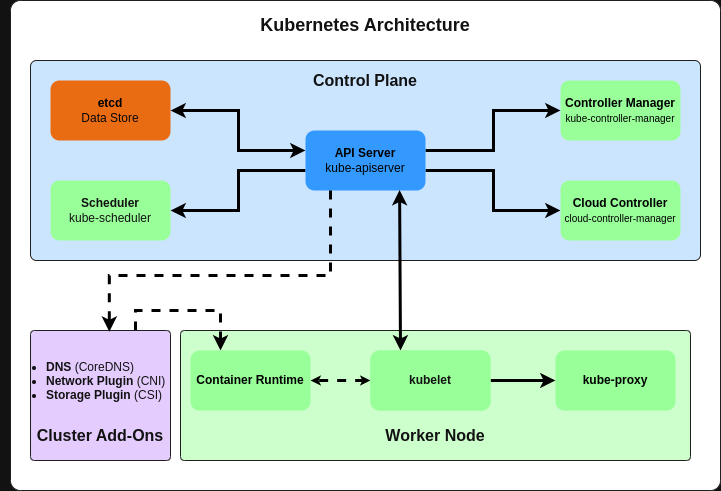
In the diagram, indirect communication refers to connections between components that don't communicate directly with each other but interact through an intermediary component.
The dashed lines represent these indirect communications, indicating that:
These components don't have a direct API connection
- They may communicate through another component (typically the API Server)
- They might use a shared resource for coordination
- They could be passing events or messages through a queue or bus
Specific examples in the diagram:
kubelet to kube-proxy:
These don't communicate directly. Instead, kubelet and kube-proxy both talk to the API Server independently. The kube-proxy watches for Service and Endpoint objects in the API Server, while kubelet reports node and pod status.
API Server to Add-ons:
The API Server doesn't explicitly call the add-ons. In
Kubernetes Architecture
248 words
Move kubectl and kube-apiserver
Open kubectl and kube-apiserver
kubectl connects directly to the kube-apiserver. It is the front door to your Kubernetes cluster. It exposes the Kubernetes API that all components and users interact with, including:
- External tools like kubectl
- The Kubernetes dashboard
- Other control plane components
- Custom controllers and operators
When you run a command like kubectl get pods, your kubectl client authenticates with the kube-apiserver, which then validates your request, retrieves the data from etcd (via the apiserver), and returns the results.
The apiserver is the only component that directly communicates with the etcd datastore, acting as a gatekeeper to ensure all operations are properly authenticated, authorized, and validated before making any changes to the cluster state.
This centralized API design is intentional - it ensures all changes to cluster state go through a single, well-defined interface with consistent authentication, authorization, and validation.
kubectl and kube-apiserver
141 words
Move kube-scheduler
Open kube-scheduler
The kube-scheduler is a critical control plane component responsible for deciding where new pods should run in your Kubernetes cluster.
Here's how it works:
- When you create a new pod with no assigned node, the scheduler notices this unscheduled pod
- It evaluates all available nodes in your cluster to find the best fit
- It considers multiple factors in its decision:
- Resource requirements (CPU/memory requested by the pod)
- Hardware/software constraints (node selectors, taints and tolerations)
- Affinity/anti-affinity rules (keeping pods together or apart)
- Data locality (placing pods near their data)
- Deadlines
The scheduling process happens in two phases:
- Filtering: Eliminates nodes that can't run the pod (insufficient resources, doesn't match node selectors, etc.)
- Scoring: Ranks the remaining nodes to find the best fit
Once it finds the optimal node, it updates the pod definition with the node name, and the kubelet on that node takes over to actually creat
kube-scheduler
209 words
Move Affinity, Taints and Tolerations
Open Affinity, Taints and Tolerations
Affinity, taints and tolerations serve different purposes in Kubernetes pod scheduling:
Taints and Tolerations
- Taints are applied to nodes and act like repellents
- Tolerations are applied to pods and allow them to schedule on tainted nodes
- Think of it as: "Nodes repel pods unless the pods have matching tolerations"
- Use case: Reserve nodes for specific workloads (e.g., GPU nodes only for ML workloads)
Node Affinity
- Attracts pods to specific nodes based on node labels
- More expressive than nodeSelector (supports "preferred" vs "required" rules)
- Think of it as: "Pods are attracted to nodes with specific attributes"
- Use case: Schedule pods on nodes with SSDs or in specific availability zones
Pod Affinity/Anti-Affinity
- Controls pod placement relative to other pods
- Affinity: "Place me near pods with label X"
- Anti-affinity: "Don't place me near pods with label X"
- Use case: Co-locate related services for performance or spread replicas across nodes for hig
Affinity, Taints and Tolerations
239 words
Move Example: affinity, taints, tolerations
Open Example: affinity, taints, tolerations
Examples of both taints/tolerations and affinity in Kubernetes:
1. Applying a taint to a node (using kubectl):
# Add a taint to a node
kubectl taint nodes node1 dedicated=gpu:NoSchedule

# Remove a taint from a node
kubectl taint nodes node1 dedicated=gpu:NoSchedule-
2. Pod definition with tolerations and affinity:
apiVersion: v1
kind: Pod
metadata:
  name: ml-training-pod
  labels:
    app: ml-training
spec:
  # TOLERATIONS: Allow this pod to schedule on GPU-tainted nodes
  tolerations:
  - key: "dedicated"
    operator: "Equal"
    value: "gpu"
    effect: "NoSchedule"

  # NODE AFFINITY: Prefer nodes with GPU, but can run elsewhere if needed
  affinity:
    nodeAffinity:
      requiredDuringSchedulingIgnoredDuringExecution:
        nodeSelectorTerms:
        - matchExpressions:
          - key: gpu
            operator: Exists
      preferredDuringSchedulingIgnoredDuringExecution:
      - weight: 100
        preference:
          match
Example: affinity, taints, tolerations
346 words
Move How Pods are Created
Open How Pods are Created
After the kube-scheduler decides where to place a pod, the kubelet takes over.
Here's the full workflow:
- kube-apiserver receives a request to create a new pod (from kubectl, a controller, etc.)
- kube-scheduler notices the unscheduled pod and decides which node should run it
- kube-scheduler updates the pod definition with the chosen node name (
nodeName field) via the API server
- kubelet on the selected node is constantly watching the API server for pods assigned to its node
- kubelet sees the new pod assignment and takes responsibility for creating it
- kubelet instructs the container runtime (Docker, containerd, etc.) to pull the required images and start the containers
- kubelet continuously monitors the pod's containers and reports status back to the API server
The kubelet is like the "node manager" - it's an agent running on every node in the cluster that:
- Ensures containers are running in a pod as expected
- Mounts volumes
- Downloads secre
How Pods are Created
215 words
Move How Downloading Secrets Works
Open How Downloading Secrets Works
The process of downloading and using secrets in Kubernetes involves several components working together:
Secret Creation: First, a secret is created in the cluster, typically using kubectl or programmatically through the API:
kubectl create secret generic db-credentials --from-literal=username=admin --from-literal=password=secret123
Pod Reference: A pod spec references this secret either as environment variables or as mounted volumes:
# In a pod spec
volumes:
- name: secret-volume
 secret:
   secretName: db-credentials
API Server Role: When a pod with secret references is created, the API server:
- Validates that the pod has permission to access the requested secrets
- Does not store the full pod spec with embedded secret data in etcd
Kubelet's Secret Download Process:
- When the kubelet starts a pod, it determines which secrets the pod needs
- Kubelet makes authenticated, authorized reque
How Downloading Secrets Works
306 words
Move kube-controller-manager
Open kube-controller-manager
The kube-controller-manager is a control plane component that runs multiple controller processes in a single binary for simplicity. Think of it as the "operator" that continuously monitors the cluster state and makes changes to move the current state toward the desired state.
Here are the key controllers it manages:
Node Controller:
- Monitors node health through the kubelet
- Notices when nodes go down and evicts pods if needed
- Maintains an accurate count of available nodes
Replication Controller:
- Ensures the correct number of pod replicas are running
- Creates or deletes pods as needed to maintain the desired count
Endpoints Controller:
- Populates the Endpoints object (links Services to Pods)
- Creates the mapping between Services and the Pods that back them
Service Account & Token Controllers:
- Creates default accounts and API access tokens for new namespaces
- Manages service account credentials for pods
**Job Con
kube-controller-manager
338 words
Move Cloud Controller Manager
Open Cloud Controller Manager
The Cloud Controller Manager (CCM) is a specialized control plane component that integrates Kubernetes with the underlying cloud provider's APIs. It was introduced to decouple the core Kubernetes code from cloud-provider-specific code, making Kubernetes more modular and easier to maintain.
Key functions of the Cloud Controller Manager:
- Node Controller:
- Checks with the cloud provider API to verify if a node has been deleted after it stops responding
- Updates node-specific cloud details like instance type, region, zones, etc.
- Route Controller:
- Configures network routes in the cloud infrastructure
- Enables pod-to-pod communication across different nodes
- Service Controller:
- Creates, updates, and deletes cloud provider load balancers when LoadBalancer-type services are created/modified/deleted
- Updates service status with load balancer details (IP addresses, hostnames)
Volume Controller (in some implementations):
Cloud Controller Manager
319 words
Move kube-proxy
Open kube-proxy
The kube-proxy is a network proxy that runs on each node in your Kubernetes cluster, implementing part of the Kubernetes Service concept. It's responsible for maintaining network rules that allow network communication to your Pods from inside or outside the cluster.
Main responsibilities of kube-proxy:
Service Abstraction Implementation:
- Enables the Kubernetes Service concept to work by directing traffic to the appropriate backend Pods
- Makes Services accessible within the cluster and (when configured) from outside
Network Rule Management:
- Maintains network rules on nodes (using iptables, ipvs, or userspace proxying)
- Updates rules when Services and Endpoints change
- Handles port forwarding for Services
Operational modes of kube-proxy:
- IPTables mode (default):
- Uses Linux kernel iptables for packet filtering and NAT
- Rules randomly select a backend Pod (for load balancing)
- More efficient than userspace mode, but limited de
kube-proxy
405 words
Move The Container Runtime
Open The Container Runtime
The container runtime is the software responsible for running containers on each node in your Kubernetes cluster. It's the low-level component that actually creates, starts, stops, and manages the container processes.
Core responsibilities of a container runtime:
Image Management:
- Pulls container images from registries
- Extracts and stores images locally
- Manages image layers and caching
Container Lifecycle:
- Creates container environments (namespaces, cgroups)
- Starts container processes
- Monitors running containers
- Stops and removes containers
- Handles container exit codes
Resource Control:
- Enforces CPU and memory limits
- Manages container cgroups
- Implements resource isolation
Storage Management:
- Mounts volumes into containers
- Sets up overlay filesystems
- Manages container storage drivers
Network Setup:
- Creates network namespaces
- Sets up container network interface
The Container Runtime
379 words
Move The DNS Add-On
Open The DNS Add-On
The DNS add-on in Kubernetes (typically CoreDNS) provides critical service discovery functionality throughout your cluster. It's one of the most important add-ons and is deployed by default in most Kubernetes installations.
Key functions of the Kubernetes DNS add-on:
Service Discovery:
- Creates DNS records for Kubernetes Services
- Allows pods to find and connect to Services using names instead of IP addresses
- Enables applications to use stable DNS names regardless of pod restarts or scaling
Name Resolution Patterns:
<service-name>.<namespace>.svc.cluster.local → resolves to service's cluster IP<pod-ip-with-dashes>.<namespace>.pod.cluster.local → resolves to pod's IP- Supports shorter forms within the same namespace (just
<service-name>)
DNS Policy Enforcement:
- Handles DNS query policies based on pod DNS configurations
- Supports different DNS policies (ClusterFirst, Default, None, etc.)
Customizable Records:
The DNS Add-On
396 words
Move Network Plugins
Open Network Plugins
Network plugins implement the Container Network Interface (CNI) in Kubernetes, providing the crucial ability for pods to communicate with each other across nodes. They're responsible for the "plumbing" that enables network connectivity in your cluster.
Core responsibilities of network plugins:
Pod Networking:
- Assign IP addresses to pods
- Create virtual interfaces for containers
- Establish routes between pods across different nodes
- Implement the Kubernetes networking model
Network Policy Enforcement (in many plugins):
- Implement Kubernetes NetworkPolicy resources
- Provide pod-level firewalling
- Control ingress/egress traffic at the pod level
Cross-Node Communication:
- Create overlay networks or configure underlay networks
- Handle encapsulation/decapsulation of packets
- Manage routing tables and rules
The Kubernetes networking model requires that:
- All pods can communicate with all other pods without NAT
- All nod
Network Plugins
496 words
Move Storage Plugins
Open Storage Plugins
Storage plugins in Kubernetes provide the infrastructure for persistent data storage, ensuring that your applications' data can survive pod restarts and rescheduling. They implement the Container Storage Interface (CSI), which is the standardized way Kubernetes interacts with diverse storage systems.
Core responsibilities of storage plugins:
Volume Provisioning:
- Dynamically create storage volumes when PersistentVolumeClaims are made
- Implement StorageClasses that define different storage options
- Handle volume parameters (size, performance tier, encryption, etc.)
Volume Attachment:
- Attach storage to the appropriate nodes
- Make volumes available to the kubelet for mounting
- Handle multi-attach constraints
Volume Mounting:
- Mount volumes into pod file systems
- Set appropriate permissions and ownership
- Handle mount options
Volume Lifecycle Management:
- Expand volumes when requested
- Snapshot volumes for backu
Storage Plugins
503 words
Move Horizontal Pod Autoscaler
Open Horizontal Pod Autoscaler
The Horizontal Pod Autoscaler (HPA) fits into the Kubernetes control plane as yet another controller that automatically adjusts the number of pods in your deployments based on observed metrics. Here's how it works and where it fits in the Kubernetes architecture:
What HPA Does:
The HPA automatically scales the number of pods in a deployment, replication controller, or replica set based on:
- CPU utilization
- Memory usage
- Custom metrics
- External metrics
Where HPA Fits in the Kubernetes Architecture:
┌─────────────────────────────┐
│     Control Plane           │
│                             │
│  ┌─────────────────────┐    │
│  │  API Server         │    │
│  └─────────────────────┘    │
│            ▲                │
│            │                │
│            ▼                │
│  ┌─────────────────────┐    │
│  │  Controller Manager │    │
│  │                     │    │
│  │  • Node Controller  │    │
│  │  • Replica Controller    │
│  │  • ...
Horizontal Pod Autoscaler
580 words
Move Custom vs External Metrics
Open Custom vs External Metrics
The distinction between custom metrics and external metrics in Kubernetes HPA is important as they serve different purposes and have different sources:
Custom Metrics vs External Metrics
| Aspect |
Custom Metrics |
External Metrics |
| Source |
Inside the Kubernetes cluster |
Outside the Kubernetes cluster |
| Relation |
Associated with Kubernetes objects (pods, nodes, etc.) |
Independent of Kubernetes objects |
| API |
custom.metrics.k8s.io API |
external.metrics.k8s.io API |
| Target Types |
Object, Pods, Resource |
External |
| Selection |
Kubernetes objects (by name/label) |
Metric name and labels |
Custom Metrics:
Custom metrics are metrics collected from workloads running inside your Kubernetes cluster. They're typically:
- Directly associated with Kubernetes objects (pods, deployments, services)
- Collected by in-cluster monitoring systems (like Prometheus)
- Referenced by object name or label selector
Custom vs External Metrics
487 words